Insulation Removal is a messy job, and not for DIYers without the right equipment. A powerful insulation removal vacuum to suck up debris, and garbage bags for disposal are key pieces of equipment.
It’s also essential to prepare the area before insulation removal begins by clearing storage items and sealing off the attic. This minimizes the risk of injury and damage during the process. Click the https://www.perthinsulationremover.com.au/ to learn more.
1. Better Indoor Air Quality
Insulation removal may not be at the top of your home improvement to-do list, but it’s a vitally important project that can improve indoor air quality significantly. Old insulation can harbor mold, pests, and other contaminants that degrade indoor air quality (IAQ), and replacing it with modern, non-toxic materials will help ensure clean, healthy, and comfortable living spaces.
If you’re planning to tackle an attic insulation removal project yourself, keep in mind that it’s a demanding DIY project that requires strict adherence to safety measures. In addition, it’s a good idea to prepare the work area, covering up items that you don’t want to get dirty and setting up a way to dispose of the waste, such as a dumpster.
Generally, it’s best to leave the insulation removal process to professionals. Not only will this make the job easier and safer, but it will also ensure that the insulation is removed effectively and efficiently. It’s important to look for a company that specializes in insulation removal and has a track record of delivering high-quality results.
Poor indoor air quality can lead to a variety of health problems, including respiratory issues and allergic reactions. If you notice signs of compromised insulation, such as water stains or pest infestations, it’s time to call in the professionals for insulation removal and replacement.
Inconsistent indoor temperatures are another sign that your insulation needs to be replaced. If your home is poorly insulated, heat and cool air will escape through the attic, forcing your heating and cooling systems to work harder to maintain a comfortable temperature.
Insulation can contain volatile organic compounds, such as formaldehyde and asbestos, which can off-gas into your home, causing respiratory irritation and other serious health issues. Insulation removal can eliminate the source of off-gassing and reduce your exposure to these harmful chemicals, improving your home’s IAQ and ensuring a healthier environment for your family.
In homes in the Great Plains region, maintaining a healthy indoor environment is crucial to maintaining optimal comfort and boosting energy efficiency. Insulation removes pollutants that can degrade IAQ and promotes improved indoor air quality in South Dakota homes.
2. Reduced Energy Bills
Insulation is the unsung hero of your home, keeping you cozy in winter and cool in summer. When it’s working as intended, it can save you up to 50% on heating and cooling bills. However, over time insulation can lose its effectiveness and may need to be removed and replaced. Old insulation can also be a hiding spot for rodents, pests, and mold growth.
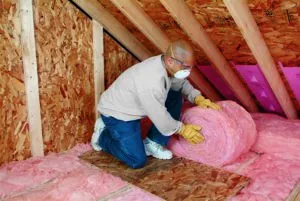
Removing blown-in cellulose or fiberglass insulation is a messy job that requires a lot of effort and equipment. It’s a good idea to hire professionals for this task, as they have the proper tools and safety gear to do the job efficiently. The preferred method for removing blown-in insulation is the use of an industrial vacuum. This is a gas-powered machine that uses a hose to suck the insulation into a waste bag, where it can be easily transported outside for disposal. This method is also safer than trying to remove blown-in insulation manually, as it reduces the risk of airborne pollutants.
While adding new insulation over old can be a solution in some cases, it’s generally better to have all the old insulation removed before installing any replacement. This ensures that you get the most optimal R-value for your home, which will significantly boost energy efficiency and lower energy costs. It will also eliminate gaps and inconsistencies that can be caused by settling over time.
Another benefit of removing and replacing old insulation is that it helps contribute to a greener planet. When the insulation is recycled, it keeps harmful materials out of landfills and reduces the need for new insulation to be made from raw materials. In addition, by reducing greenhouse gas emissions, you’re helping to make our planet a cleaner and healthier place for everyone.
While many homeowners think that insulation is an affordable DIY project, it’s actually a complicated and dangerous job. Without the proper safety equipment, it’s easy to inhale hazardous particles that are found in older insulation materials. Hiring a professional service will ensure that the process is completed safely, protecting your family and boosting your home’s value.
3. Reduced Risk of Mold Growth
Insulation can be a breeding ground for mold and mildew spores if it becomes wet. This creates musty odors that spread through the entire home and poses health risks for household members. Inhaling these spores can cause respiratory issues and exacerbate existing allergies and asthma. Replacing old insulation removes these contaminants and improves air quality throughout the house.
Insulation may become damaged or contaminated due to a number of reasons, including water leaks, pest infestations, or just age. Regular inspections help to spot these problems early, allowing them to be addressed promptly before they have a chance to worsen. In addition, removing outdated insulation can pave the way for new, more efficient materials.
If the contaminated insulation is blown or loose-fill, it can be sucked out using an extraction machine. Fiberglass batts, on the other hand, must be removed by hand, one at a time. This can be a difficult and messy job, but it is important to clean and dispose of any contaminated insulation quickly to prevent the spread of mold spores throughout the house.
Removing contaminated insulation and replacing it with high-rvalue material will greatly boost the energy efficiency of a building. This reduces the amount of heat that escapes during the winter and the amount of heat that enters during the summer, saving money on energy bills while improving comfort levels for building occupants.
Keeping the level of moisture in the attic low is also important to help reduce mold growth. This can be done by installing a dehumidifier and maintaining proper ventilation. During renovations and remodeling projects, it is also a good idea to replace the insulation in the attic. This will not only increase the energy efficiency of a building, but it will also help to minimize the risk of mold and other contaminants.
While it is not possible to completely eliminate the risk of mold, regular insulation inspections and maintenance can significantly lower the chances of it occurring. This is especially true if these measures are coupled with other mold prevention strategies, such as plumbing and roof leaks being addressed promptly, moisture control in the attic, and pest prevention tactics.
4. Increased Resale Value
As a homeowner, you may be weighing the pros and cons of certain home improvement projects that will increase your resale value. Some of the more obvious improvements that you might consider include an outside deck, a kitchen remodel, or new siding on your home. Another way to increase your resale value is to properly insulate your attic. Many homeowners are surprised to learn that insulating the attic is actually one of the most cost-effective ways to boost your home’s resale value.
While you may be tempted to DIY your insulation removal, it is highly recommended that you hire professionals who have experience working with insulation. Old insulation can contain contaminants like mold, mildew, animal droppings, and pest residue that are dangerous to your health. When these substances are disturbed, they can release airborne particles that trigger allergy-like symptoms and even lung disease. Professionals are trained to work with a variety of different insulation materials, including fiberglass insulation, so they know how to remove the material safely and without disturbing other portions of your home.
In addition, professionals have access to advanced equipment that ensures the proper disposal of your old insulation. This is a vital step in ensuring that your home’s new insulation is not only effective, but also safe and healthy to live with.
Aside from the environmental benefits of a clean, safe living environment, properly removed and replaced insulation is an attractive selling point for potential home buyers. Enhanced energy efficiency is becoming a top priority for homeowners, and homes with new, well-functioning insulation can often command a higher asking price than those that have outdated or damaged insulation.
Additionally, the recycled materials used for modern insulation prevent hazardous waste from entering the environment and help contribute to a circular economy wherein unwanted or unusable materials are reused to create new products. This is a great way to support sustainable practices and promote a healthier, more environmentally conscious future. So if you’re looking to increase your property value, consider upgrading your attic with new, efficient insulation. It will benefit you in the long run and make your home more appealing to eco-conscious buyers when it comes time to sell.